Translate

Saturday, 27 August 2011

SketchyThursday 8.25

Hello all and a happy Bank Holiday weekend to those in the UK!

Today's lovely sketch idea comes from the masters of sketches......SketchyThursday!


So before I show you my version I shall explain the thinking behind my lo. I love white backgrounds and in my craft room I have stacks of coloured cardstock that never sees the light of day, so I have decided to start using it. Can't say I am loving it but I am trying!!!


These lovely photos are of my GD and DH on a family day we had in June...she do love her Dudie :0)

I masked where the photos were going with larger circles and spritzed with ink and Perfect Pearls to create the frames. Red rub ons and yellow button are American Crafts, the circle rub on is from Crate Paper, the cardstock bits and bobs are Echo Park Hometown Summer punchouts. The title sticker is Anna Griffin, the bird is GCD studios chipboard and the butterfly and flower stamps are Maya Road.

Thanks for looking and hope your day is a sunny one....unlike here!!!
Ali x

Friday, 26 August 2011

Sketchabilities #53

Wow! I love where this sketch took me..........proper crafting :0) Inks, spritzers, rub ons, dies, stamps you name it and it was out on the desk and oh what a fun and messy time I had!

Here is the sketch that inspired my layout


and here is my DD#2 posing, natural and even a photoshopped photo (courtesy of DH)


I inked the doily and chipboard hearts with Black Soot, spritzed and blobbed (very technical!) licorice ink onto lilac cardstock. Stamped the ticket onto purple textured Bazzil and cut it out and then using the same cardstock layered up 2 Spellbinders label dies to make a frame. The corner and dotty line rub ons are American Crafts and the flourish is a randon one from my stash. The clock stamp is from Abi's Crafts.

Thanks for looking
Ali x

Wednesday, 24 August 2011

Sketch Along Tuesday #22

I love this sketch from Frosted Designs :0) when I first saw it I was worried that it may be too 'fussy' for my taste but I am delighted with the results!


My take on the sketch uses a photo of my Mum and her Nana. I love the 'natural' posing! LOL Please forgive the wierd colouring of the photos, it is a very grey day here (again..........grrr!) so it looks a lot 'cooler' than it does in real life.


I have used Crate Paper Emma's Shoppe for pretty much all of the lo with the exception of the buttons, seam binding and a couple of American Crafts rub ons. The stamps are TPC (I think!)

Thanks for looking
Ali x

Dad 'Grunge' Card

Hi all,

not my Dad but my BF's. He is going to be 70 next month and she wanted a 'blokey' card for him, so I flicked through my Tim Holtz papers and found a dog, a pipe, a calendar and a map (all things that relate to him and his birthday - although a French map would have been better!)

I used an 8 x 8 card and matted a piece of DCWV metallic paper in gunmetal with a square aperture cut out in the middle. The mat has been mounted onto foam tape to lift it off the page but I don't think you can see that from the photo.

I embossed some of the other bits of papers and inked all of the edges in black, added a few metal embellishments and then stuck the 70 onto the card base within the aperture.

I love it.............and hope both BF and her Dad like it too :0)

Click on the image to see it in more detail. Thanks for looking
Ali x

Thursday Takes #54

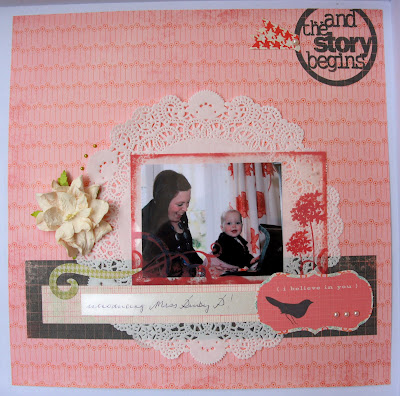
Another lovely layout from Sketches in Thyme


I used an old photo of GD and DD#1 as I am waiting for my prints to arrive, we have had so many problems with our wireless printers recently :0( my one keeps messing up the colour and DH's one won't print wirelessly!

Never mind this photo of the girls playing the piano at my Mum and Dad's house has been sitting waiting patiently and the colours of the photo meant I had to come out of my cool colour comfort zone! So here is my take on the sketch:

The papers are from My Mind's Eye So Sophie collection as is the green swirl, the acetate overlay and the bird tag. The phrase at the top of the page was cut on the Sihouette and the flower is from iamroses.com. The doilie and pearls were from my stash.

Look out for more posts today...having a crafting/blogging frenzy :0)
Ali x

Saturday, 20 August 2011

Pink Paislee 6 x 12 'Junque' Album

I finally finished my album last night! It's been knocking around for a while and at one stage I didn't think I would ever do it but now that it's done I am loving it :0)

I thought that today instead of just uploading the photos to share I would go through each page, the materials and how I assembled the lo.

Get ready, it's going to be a long post!

First thing to note is that the papers are primarily Pink Paislee Daily Junque, I also bought the Ephemera pack and the acrylic stamps. The album itself is PP Artisan collection, something my DD#1 bought for me last Sep, tsk, tsk!


PP Daily Junque number paper was cut into a semi circle, then 'write' tag from the DJ Ephemera pack was stuck down with a pink ticket tucked behind. The heart pin is Heidi Swapp.
The bird and flower die cut are also DJ Ephemera.
The pink floral card is from a Making Memories kit and has a Fiskars 'Family' stamp stamped in Black Momento Ink.
The metal heart, from the Making Memories kit has some black organza ribbon tied to it and a safety pin with a Tim Holtz Muse Token threaded on. The heart was adhered with Glossy Accents.
The white Prima flowers have Basic Grey 'Sugared' brads pushed through their middle but have been stuck in place with glue.


The first page (sorry I didn't take a picture) is a pink clocking in card from the Ephemera pack. I wrote about the pictures in the album - they are all random photos that I found lying around in various packets! - tied some Baker's Twine aroud it and stuck a photo on the reverse.

This was one of the 6 chipboard sheets that were inside the album (I didn't use all of them as they make good covers for more albums!) 
I covered it with half of a DJ paper, double matted the photos on two different shades of blue card and then white card.
Folded a piece of green ribbon and secured it with a glue dot and then placed a Prima resin flower on top.
The pink rose is cut from trim by American Crafts (I can only use this sparingly!)
The little banner is stamped with the PP Daily Junque stamps.
Finally I stuck the Don't Forget image from the DJ Ephemera pack on.
Stuck another half of PP DJ paper onto the backside of the chipboard sheet.
Stuck the note card from the Ephemera Pack and then stamped 4 images from PP DJ set and layered them using silicone glue so that they were at different levels.
The photo already had a border so I didn't need to mount it.

This little glassine envelope was in the Ephemera Pack as was the 'typed' strip that I stuck onto the envelope.
The yellow tag inside cut from one of the DJ papers, there is one that is smothered in tags and paraphenalia and I cut alot of the bits for this album from that one sheet. On the reverse of the yellow tag is pink ledger strip with the phrase 'be yourself' and a bee :0)
This is a Webster's Pages die cut from my stash. I adhered the photo and then attached another tag cut from the DJ paper I referred to before and journalled onto it. I then put a yellow paper clip on for interest.
The reverse of the die cut is white so I stamped some Maya Road images in black and then hand sketched a broken circle round the edge.
I cut the photo using a Spellbinders circle die and matted it onto a 'Life's Portrait' Webster's Pages paper cut from a scalloped circle Spellbinders die.
The DJ number stamp was stamped off the page with a turquoise chalk ink pad.
The journal spot was again cut from the DJ paper.
This time I just cut a piece of DJ paper in half and made use of the double side.
The yellow card is from the Ephemera pack and I used this for my journalling spot.
The stapled tag was cut from some of the paper.
The paper at the bottom of the page is Webster's Pages 'Trendsetter' and the PP Artisan Flourish was  then stuck to finish it off.
This is the other side of the DJ paper and here because the paper was so busy (and upside down!) I kept it really simple. The 'happy days' tag at the top is from October Afternoon, the black 'live, laugh, love' sticker is from Webster's Pages. The typed strip is from the Ephemera pack  and was stuck so that the tag from the previous page had a bit more support. The black cabachons were from my stash and finally the journalling spot at the bottom was another card from the Ephemera pack.

This photo shows two pages the one on the left is a little Kraft file tab that I cut on my Silhouette.
There is a journalling spot on one side and a photo on the reverse with a paper clip and another of the typed strips.
The other page is a star shape that I cut on the Silhouette using more of the DJ paper.
I stuck the photo on and using more of the October Afternoon sticker tabs, placed then on the spikes with another little label sticker for some journalling.
This is the other side of the star, pretty much the same as before  making use of the double sided paper and sticker tabs (v thrifty!) the only additional thing is another October Afternoon sticker.
What I really like about this kind of album is the way all the pages layer up.

This page was done with Coredinations 'Black Magic' cardstock. I ran it through my cuttlebug with a Sizzix embossing folder .
I mounted the photo onto blue cardstock and then 'stitched' with a white gel pen.
The 'love' stamp is from the  Fiskars square label set. The frame was stamped in blue chalk ink and then the centre was done in black.
The butterflies were cut from DJ paper using a Tim Holtz die.
Finally a little yellow button ties in with the colour core on the cardstock.

I really like the debossing on this side so I kept this page clean and simple.
The photos was mounted onto black cardstock and then I took one of the typed strips from the Ephemera pack and cut a ribbon tail into it.
The stamped image is from an American Crafts set (I wish I could tell you the name, but I don't have it!) I cut round the image because I loved the shape :0)


I cut this tag using the Silhouette, it's a print and cut icon and on the reverse is a journalling spot that is titled True Story.
Because I used white paper to print onto I stamped the reverse with a large Fiskars 'Family' stamp  (it's huge, I don't have a block big enough to hold it so I had to ink it up and lay it down face up and press the card to the stamp) in black and then used a photo that already had a border.
I love how this layout turned out. I hope you can see that there is an acetate page lying over the top (maybe you can now I have pointed it out!)
I shaped the acetate using a Tim Holtz 'On the Edge' bracket die and then placed an Imaginisce rub on, making sure that it would line up with the photo on the next page.
Again I just used the double sided DJ paper, matted the photo onto black card and placed that over the bee card from the Ephemera pack, before I stuck the card down I backed it with some more DJ paper as the overhang would be seen on the reverse.
I adhered Basic Grey letters to spell happy.

Very simple again, using the DJ paper I cut a scalloped circle using a Spellbinders die and placed the photo over that. The bee and word sticker are October Afternoon.
This is a Transparency Sheet from Teresa Collins 'Home'.
The trick with acetate is to remember that whatever goes on one side can be seen on the other!
When you do your gluing always line up the cardstock and images on both sides so that the glue can go where it won't be seen.
Most of the sticking was done on the reverse of this page. It is only the photo and the die cut balloon, from the Ephemera pack, that are actually attached to this side.
The quote is a stamped image from the Fiskars 'laugh' set, the yellow card has been attached at the top right and bottom left corners only.

I mounted the photo onto double sided DJ paper, knowing that the reverse would be seen on the previous page.
The 'think positive' tag was cut from the DJ paper with all the bits on and the reverse was stamped as previously explained.


This one of my favourite layouts! It's Webster's Pages 'Ladies and Gentleman' paper the had the frame already on it so I cut round the flowers and tucked my photo behind. The paper was then adhered to one of the chipboard sheets.

The stringed pearls were stuck on (the idea came from the paper as the image had pearls draped over the mirror)
The half heart is another Webster's Pages diecut and has been stamped in turquoise chalk ink with a Fiskars 'Memory' stamp. The black stamped daisy chain is from an American Crafts stamp set.
The daisy is from iamroses.com, thr birds are from Making Memories 'Vintage Findings' and the purple peg is from my stash.

Another piece of DJ paper was stuck to the chipboard sheet and because of all the 'tags' on the paper I kept this layout quite simple.
I cut another piece of the DJ 'Junque' (yes, that's the name of the design with all the bits on it!) paper and stuck it slightly over the photo as my GD was not looking her best!
Using Teresa Collins' Celebration stamps I stamped the clock and the star in black onto the pink DJ paper and cut them out.
The clock was stuck down flat but the star is on pop dots.
This is a vellum piece from the Webster's Pages diecut pack.
I stamped laugh onto a card from the Ephemera pack and stamped an arrow onto a pice of the DJ paper and cut it out.
The glue attaching the card for the reverse page is only under the photo and the tag.

This card was again a print and cut image from my Silhouette (lovely eh?)
I did nothing more than attach the photo and a metal circle embellishment from Cosmo Cricket
This little Kraft file folder was cut using the Silhouette and then I matted DJ paper on the outside pages and pale pink card on the inside for passport sized photos.
I stapled a pink ticket for added interest.

I stuck two pieces of 6 x 12 papers together as I wanted Webster's Pages 'Life's Journey' on this side but didn't like the other side of this paper for my album.
The photo was matted on as is and I attached an airmail die cut from the Ephemera pack.
The 'month' card also came from the Ephemera pack and I stamped a Fiskars square frame in turquoise chalk ink round January (as this is when the photo was taken) and added the chipboard 4 and the globe die cut.
Once again I backed the card with DJ paper to take care of the reverse on the overhang.
This is the other half of the Webster's Pages 'Ladies and Gentlemen' paper.
Starting from the top, the 'adore' bingo card is from Jenni Bowlen, the photo was cut with a Nellie Snellen square scalloped die and layered over the top.
The ticket is a stamped image from TPC onto DJ pink paper.
The Love framed paper is from a Making Memories kit. I punched the heart border with a Martha Stewart edge punch. The photo was cut with a Spellbinders circle die.
And that's it! This post was a real labour of love so if you have enjoyed reading it please leave a comment - I do so love getting them :0)

Thanks for looking, have a great weekend. I am off for dinner with DH so heading to the shower and getting my glad rags on!

Ali x

Wednesday, 17 August 2011

Pencil Lines Sketch #250

Morning all,

life has been extremely busy this last few days, I think I am trying to fit everything in during the summer break!! We received fabulous news about DD#1 who will be returning to Uni in Sep to study for her PGCE, this now means that GD will be accompanying us on holiday to Turkey :0) a) so that GD doesn't keep asking where Mummy is and b) so that DD#1 can concentrate on Uni rather than worrying about leaving her DD.
Once we are back I am sure we will all get into a routine and all will be fine............... :0/  Just need to find DD#2 the right job and life will be on an even keel, for a while!!

Thank goodness for my crafting haven, talking of which, today's lo is from the sketch at Pencil Lines:
Sketch 250

Looking at it now it would appear I completely forgot about the circle!!!

My layout is of my Nana, her mother and her sisters taken in the forties, my Aunty Pat (second in from the right) was a GI bride. Even though she left the states 40 odd years ago she still has an American accent, lol!!! Sadly, she is the only one still around....but going strong! She is fabulous :0)


From left to right Vera, Winnie, Ellen (their mother, my Big Nana) Pat and Dorie (my Nana), gorgeous girls
The background paper is Basic Grey 'brief', the rest are Cosmo Cricket 'Material Girl', Love You tag is MME, the acetate is Pink Paislee, buttons are Basic Grey 'Urban Prairie', flower is Prima.

Thanks for looking and have a great day
Ali x

Monday, 15 August 2011

Thursday Takes #53

Another super dooper sketch from the girls at Sketches in Thyme. Gave me the opportunity to use another of Mum's old photos :0)

This one is of my Nana and Grandad, Dorie and Fred Staples, on their wedding day during World War II. My Grandad was a fireman during the war, hence the uniform. As you can see my Nana didn't have the rations for an all singing wedding dress but looked stunning all the same.

She was 18 and he was 28 and they had lived on the same street since birth. My Nana always said that she knew as a small girl, when Freddie boy used to give all the kids a lift on the back of the cart, that she would marry him. They were happily married until we lost my Grandad in 1979, even after his death my Nana never had another chap in her life as she could never love anyone as much as her Fred.

Here's the sketch


and here is my layout


Papers are Anna Griffin 'Cecile' as is the title and journal spot. The sticker is also Anna Griffin, the lace and bits are from my stash. The beaded ribbon was stained with Chipped Saphire Distress Ink - I like the way the stitching has caught more of the ink.


From left to right: Gran Staples. my Grandad, my Nana, Grandad and 'Big' Nana Garlock
 Thanks so much for looking
Ali x

Sunday, 14 August 2011

Sketchy Thursdays 8.11 Challenge

Love this sketch :0), well actually just love Sketchy Thursdays! They always make me want to do a layout - even if it now means scrabbling about to find a photo!!!

I was totally caught up in the land of crafting as my BF was (note the past tense) making a scrapbook for her Dad's 70th with a little assistance from me. Popped round yesterday for a cuppa and was given the half finished album and asked to complete it as her lo's looked 'poopy' and she didn't think she could fit it in with work and the fact that I am going on holiday just before his birthday!

I started a soon as I returned home and every time I cleared up I would look at the next batch of photos and think....just one more. At 3am I put the final page on the easel to dry!!

This layout is for me, of my DD's and my little cousins. just love seeing those girls together :0)

Here is the sketch:
8.11 sketch challenge

Here is my take


Echo Park 'For the Record' Papers and Stickers, Prima E-line flowers, MS butterfly punch and Cricut 'Storybook' large flower.

Thanks for looking,
Ali x


Thursday, 11 August 2011

Pencil Lines Sketch #249

I am still scanning all the old photos taken from my Mum's, she gave me another box full at the weekend, lol, and this has got to be my all time favourite photo of my Nana.

It was taken at her surprise 70th birthday party in 1992, and sums up who she was....delight at having her family around her, laughing at a joke, wearing something from her boutique, aka local charity shop, and looking effortlessly elegant and beautiful :0)

The sketch that inspired this layout came from Pencil Lines


Background paper is Crate Paper 'Mia', the rest is Webster's Pages 'Trendsetter' plus a 'Hollywood' journalling spot, Pink Paislee Artisan flourish, Sea Green seam binding and pearls and finally an Anna Griffin 'Frances' embellishment.

Thanks for looking
Ali x

Frosted Designs Sketch #21

I am getting back into the swing things again, organised all my stamps this morning a very cathartic process! First layout of the day is inspired by the Frosted Design sketch


My lovely girls on one of the few sunny evenings we have had this summer! Papers, flower and bee are old Anna Griffin (I don't remember the name), the doily was cut with the Silhouette, the ribbon slide is Maya Road, the butterfly is a Tim Holtz die. The letters are George and Basics Shapes Cricut Cartridge and the dots are.......Stickles! Told you I would start using them :0)

Thanks for looking
Ali x

Tuesday, 9 August 2011

Cardtastic Day!

Hello,

having rigged up the Stickle station I thought I would use them on a project, DD#1 has also suggested that as I am such a coward she will take some of my cards to local shops and DD#2 is taking some in her town :0) so killing two birds with one stone, I have made these super quick and easy cards!

I am loving these new foam stamps where there is a solid shape and then the detailed overlay. I don't have any so thought I would try a similar take by stamping and cutting the shape out and using the 'hole' as a template:

I started by using Distress Ink 'Stormy Sky' and a blending tool and then over stamped with the Martha Stewart Butterfly, but it didn't look much so I blended round the edge of the image. Then I decided to stamp another butterfly onto paper and blended 'Weathered Wood' finally adding Diamond Stickles and sticking the butterfly body only.


The next one was using a Paint Dabber 'Cloudy Blue', I much preferred this one as there was some texture and patchiness to the solid shape. I used the Stickles to define the veins. Again I blended some Distress Ink round the edge as the solid shape was exactly the same size as the detailed image and then it dawned on me.....cut the hole bigger!


So the last one was done with a Paint Dabber 'Pink Sherbert' for texture and once the detail was on I decided to leave the glitter as it looked perfect as is :0) I'm not convinced that the photos are doing it any justice, still I am going to try this technique with some other stamps now!

Just before I go, here are a few more cards that I cobbled together using my October Afternoon scraps.


Thanks for looking and have a great day!
Ali x